
Create 3D UI Scene
Add to favorites
Learn how to design and implement 2D user interfaces to integrate within 3D scenes, enabling the triggering of actions on any 3D object
Play video
Create 3D UI for iOS and visionOS in Spline
1
Intro to Spline for iOS and visionOS
7:25
2
Basic Shapes in 3D Smart Home
10:12
3
Materials, Lights and Effects
12:11
4
Camera Animation and States
7:05
5
3D Thermostat and Cloner
14:38
6
Buttons and Components
8:26
7
Path Animation and Rotation
7:10
8
Create a 3D iOS App Icon
7:09
9
Create a visionOS App Icon
9:53
10
Create 3D UI Scene
9:49
11
Particles Animation
20:30
12
Export to SwiftUI Project
16:20
What is UI Scenes
UI Scenes serve as 2D canvases where users craft and implement 2D user interfaces, seamlessly integrating them with their 3D scenes. The interactive 2D UI elements created within these scenes can trigger actions on any 3D object. This cohesive framework simplifies the development of 2D user interfaces, ensuring smooth integration with 3D environments and enriching the overall user experience.
Creating a New UI Scene
To create a new UI scene, adhere to the steps below:
- Locate the Scenes panel on the left sidebar.
- Click on the + icon positioned at the top right corner.
- Choose "New UI Scene" from the options provided.

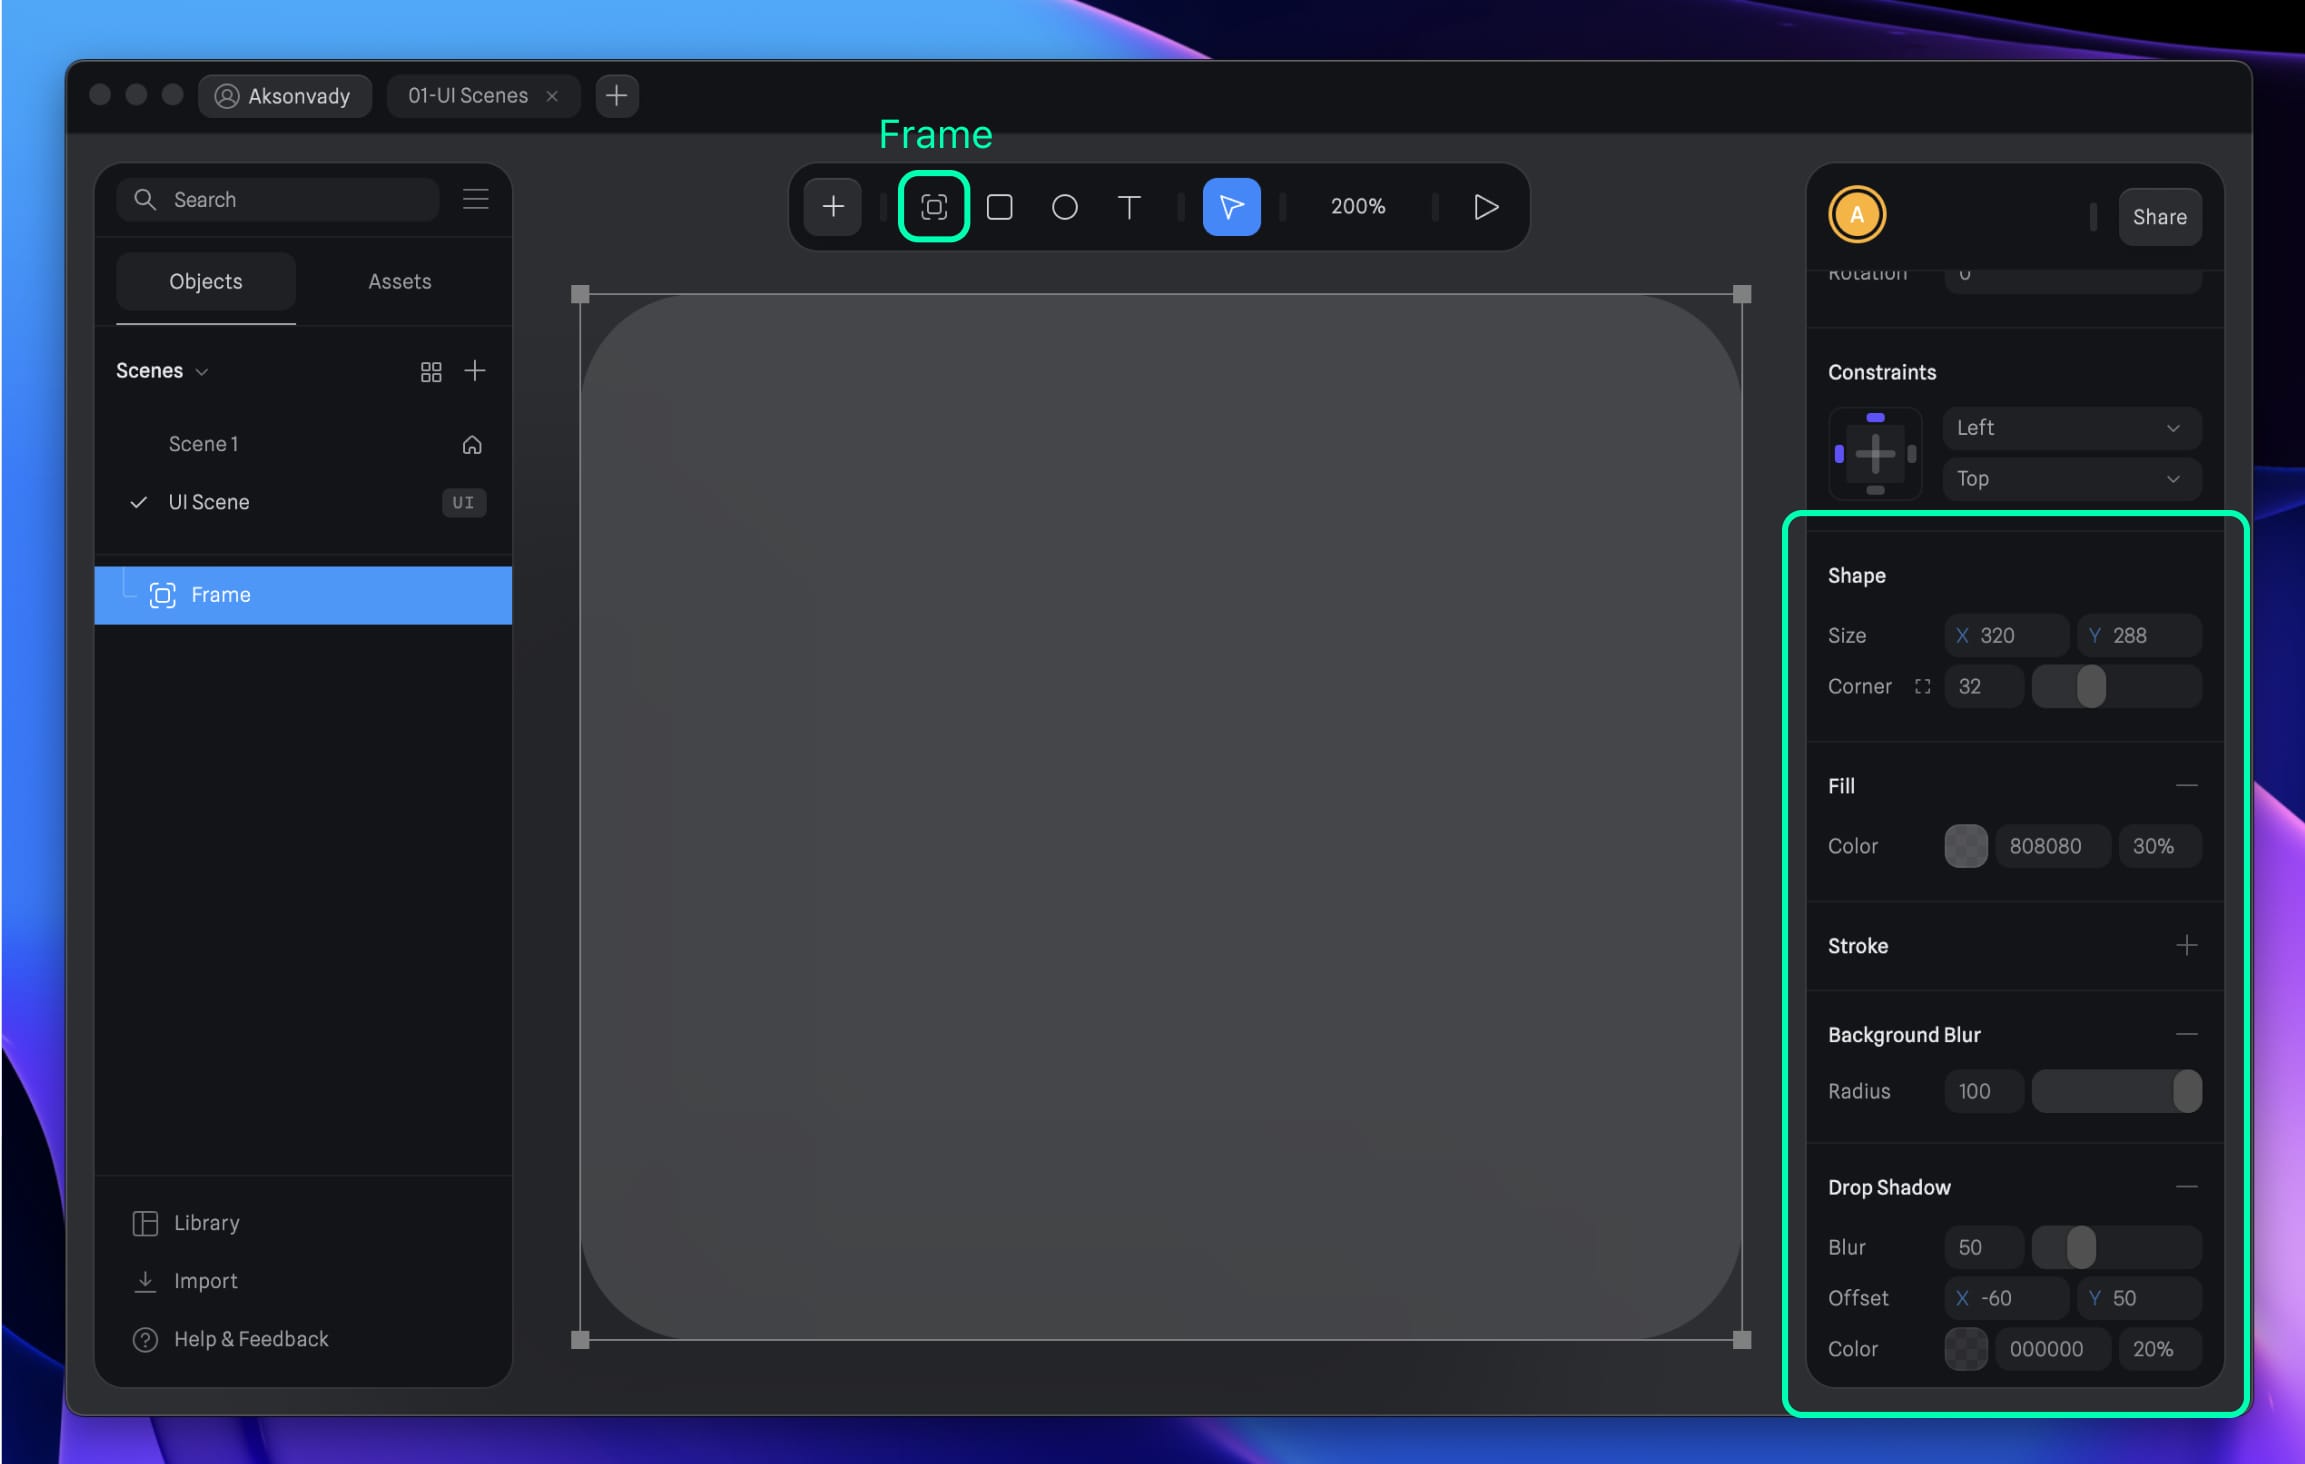
Create a Window
To create a window within the UI scene, you define its properties such as size, position, color, and visual effects. This window serves as the primary container for your UI elements, providing structure and organization to your interface design.
- Size: 320 by 288
- Position: Center
- Color: Grey (808080) at 30% opacity
- Corner Radius: 32
- Background Blur: 100
- Stroke: Inside, 1.4, in white at 20% opacity
- Shadow: Blur at 50, color at 20%, X offset -60, Y offset 50
![Create 3D UI Scene image 2]()
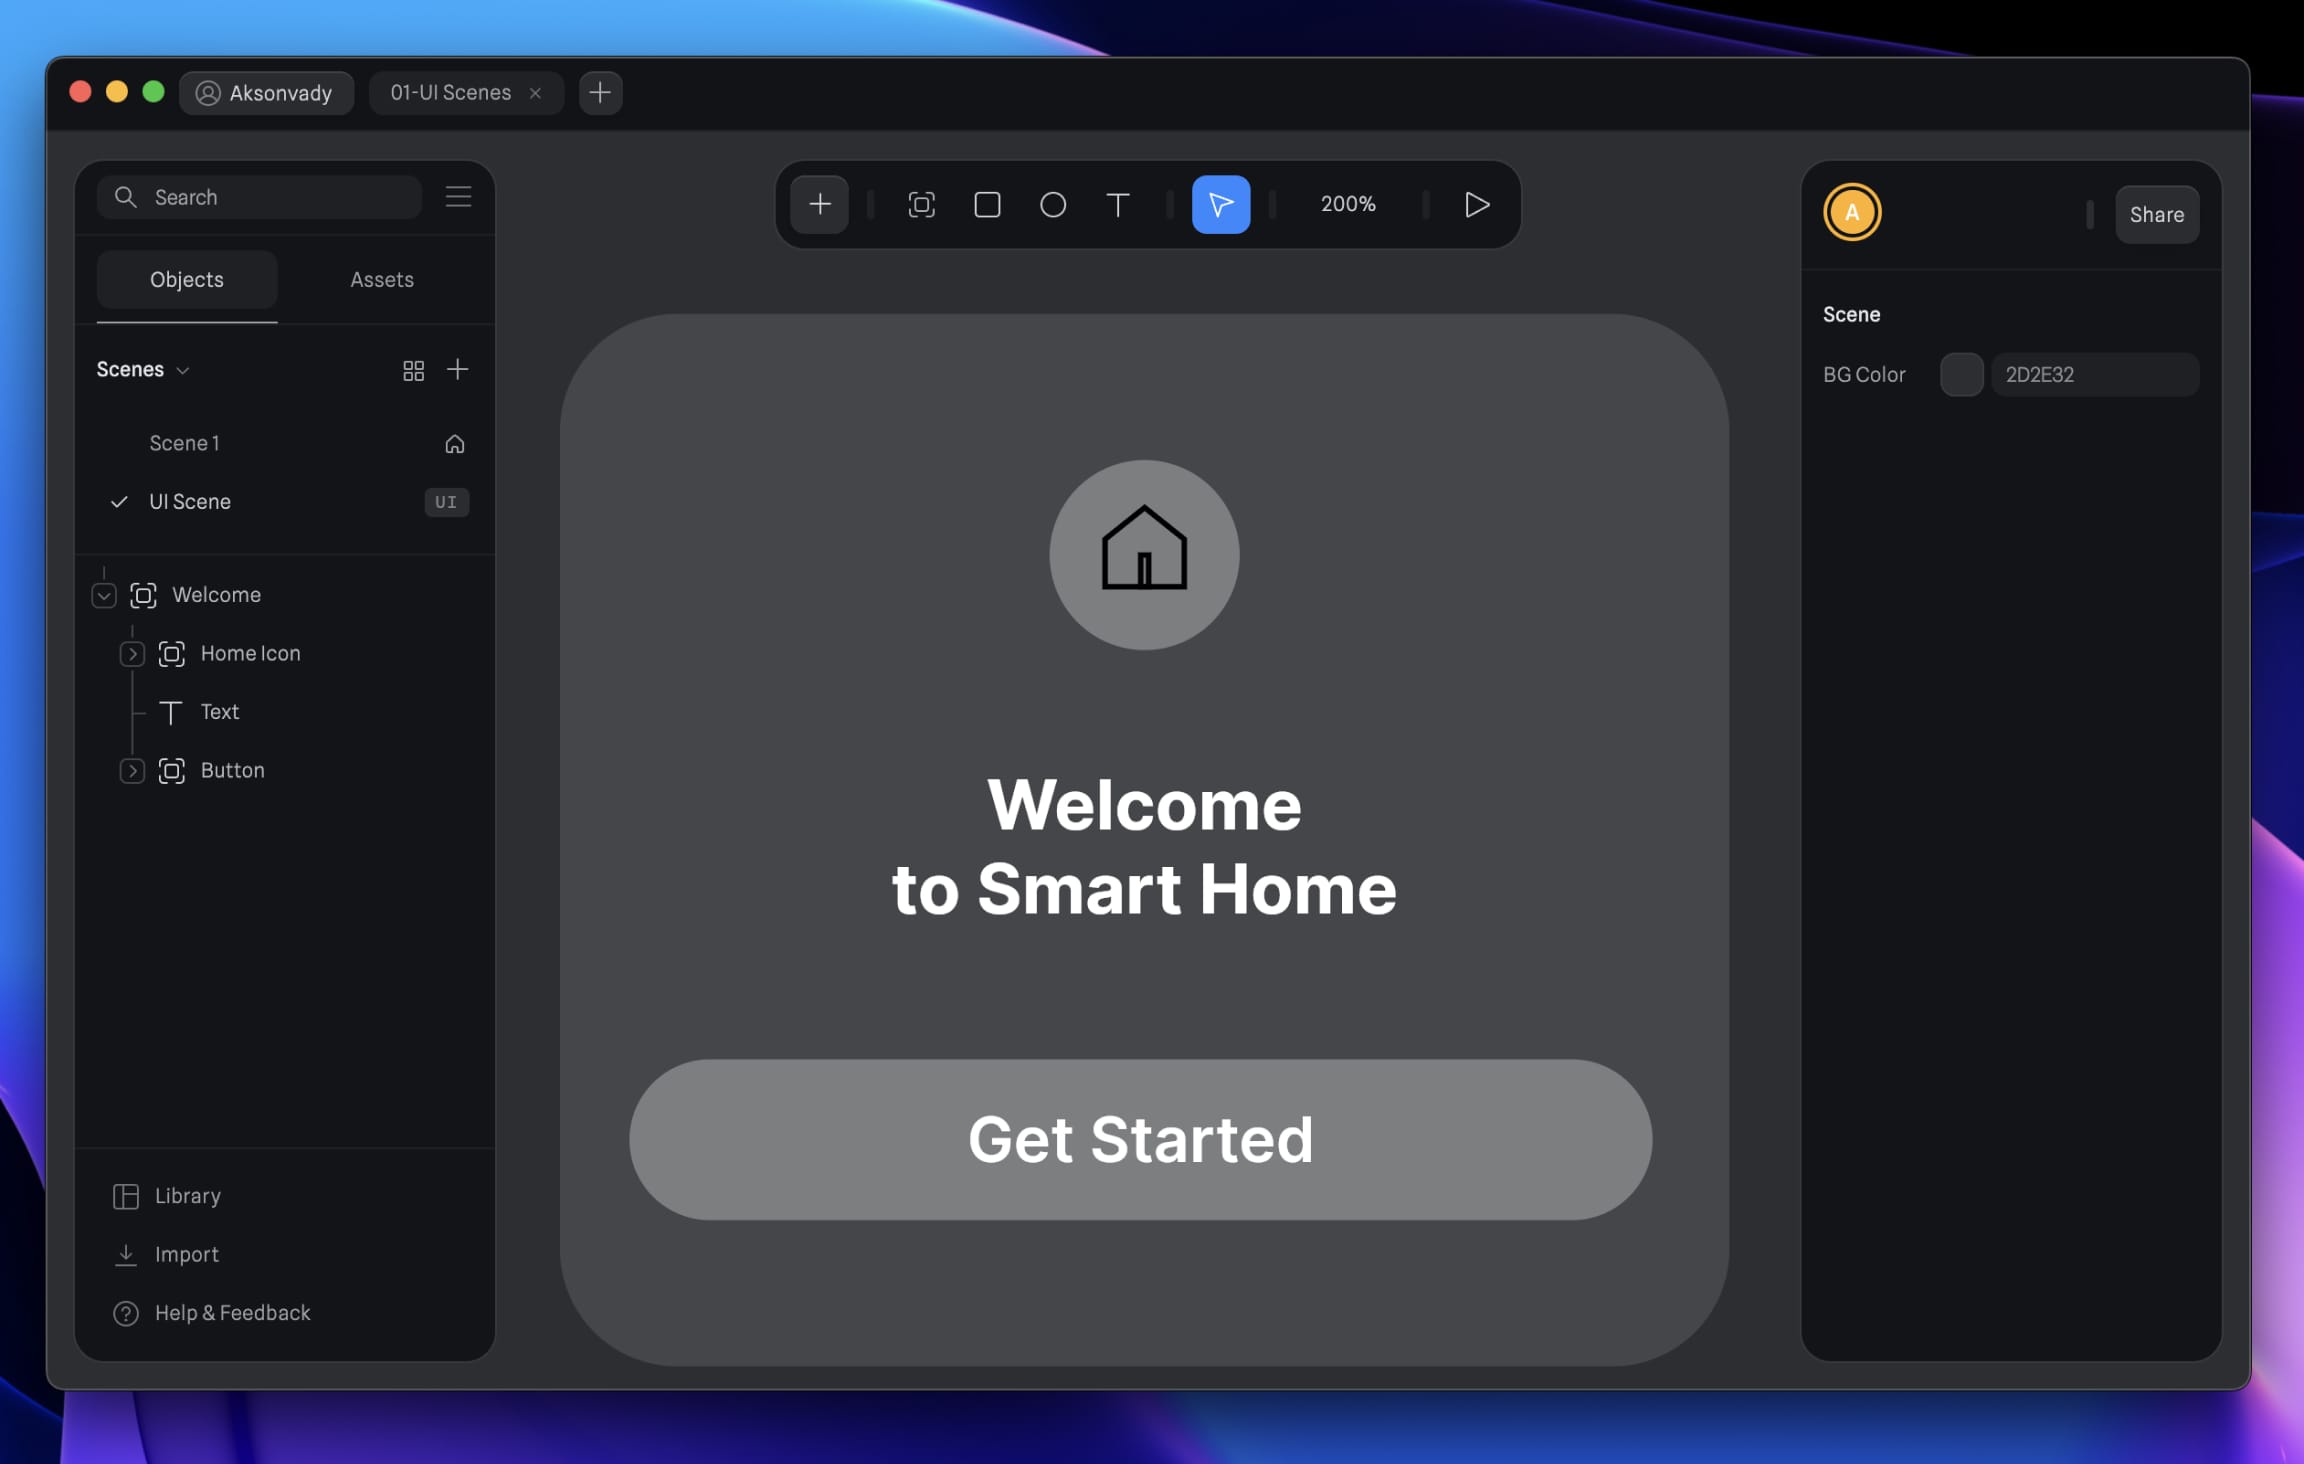
Import Icon
To bring your icon into the UI frame, Spline supports drag-and-drop functionality, allowing you to easily import assets from external sources, such as your finder, directly into the workspace. Positioning it within the frame is straightforward, allowing you to jump straight into designing within UI Scenes.
Here’s how to get started:
- Create a UI Frame: First, head to the toolbar and select the option to create a UI frame.
- Frame Size: Adjust your frame to the desired size, ideally 52x52 for icons.
- Import the Icon: Drag your icon file directly into the Spline App and drop it into your workspace. You will notice that this will create a frame for your icon.
- Adjust Position: Fine-tune your icon's placement by setting its position to X: 134, Y: 40.
 📒 Please note, currently, the settings window for importing doesn't operate as expected. This is a known issue, and they’re working on a fix to improve your design workflow.
Add Text
Let's incorporate a text field into our design. Navigate to the toolbar and click on the text icon to get started.
- Navigate to Toolbar: Accessing the text tool from the toolbar enables you to add textual content to your UI scene.
- Position and Text Field Size: Positioning the text at Y 96 and setting its field size to 320x100 pixels provide ample space for legibility and impact within the UI.
- Font Specifications: Choosing the Inter font, setting the size to 19, the weight to Bold, and aligning the text centrally, ensures that your message is delivered with clarity and emphasis.
Create a Button
Create an interactive button with these specifications:
- avigate to Toolbar and Button Dimension: By selecting the UI icon and setting the dimensions (X 280, Y 44), you define the size and shape of the interactive button, making it easily clickable.
- Corner Radius and Color: A 50-pixel corner radius and a color setting of white with 30% opacity make the button visually appealing and easy to identify against the background.
- Position: Positioning the button at X 19, Y 204 ensures that it is placed in a conventional location, making it intuitive for user interaction.
Add Text to Button
Adding text directly onto the button frame reinforces its functionality and guides the user on what action will be taken upon interaction, aligning with the overall UI theme..
- Copy the text and drag it onto the button frame.
- Set the text field dimensions to 320 by 44.
- Position the text at X 19, Y 204.
![Create 3D UI Scene image 4]()
Creating a New UI Frame in 3D
Integrating UI frames into 3D scenes expands the possibilities for user interaction and immersion. By adding a new UI frame in a 3D environment, you can overlay 2D UI elements onto 3D objects, creating dynamic interfaces that respond to user actions and environmental changes. Within any 3D scene, follow these steps:
- Locate a new object labeled "UI” in the toolbar
- Utilize this object to render any 2D frame from your UI scenes.
- Set the same size as the original(X 320, Y 288)
- Set the position to your liking
![Create 3D UI Scene image 5]()

Auto Sync between 3D & UI
And the best part? Any changes you make to the UI are automatically synced back to your 3D scene in real-time, ensuring seamless integration between the two.

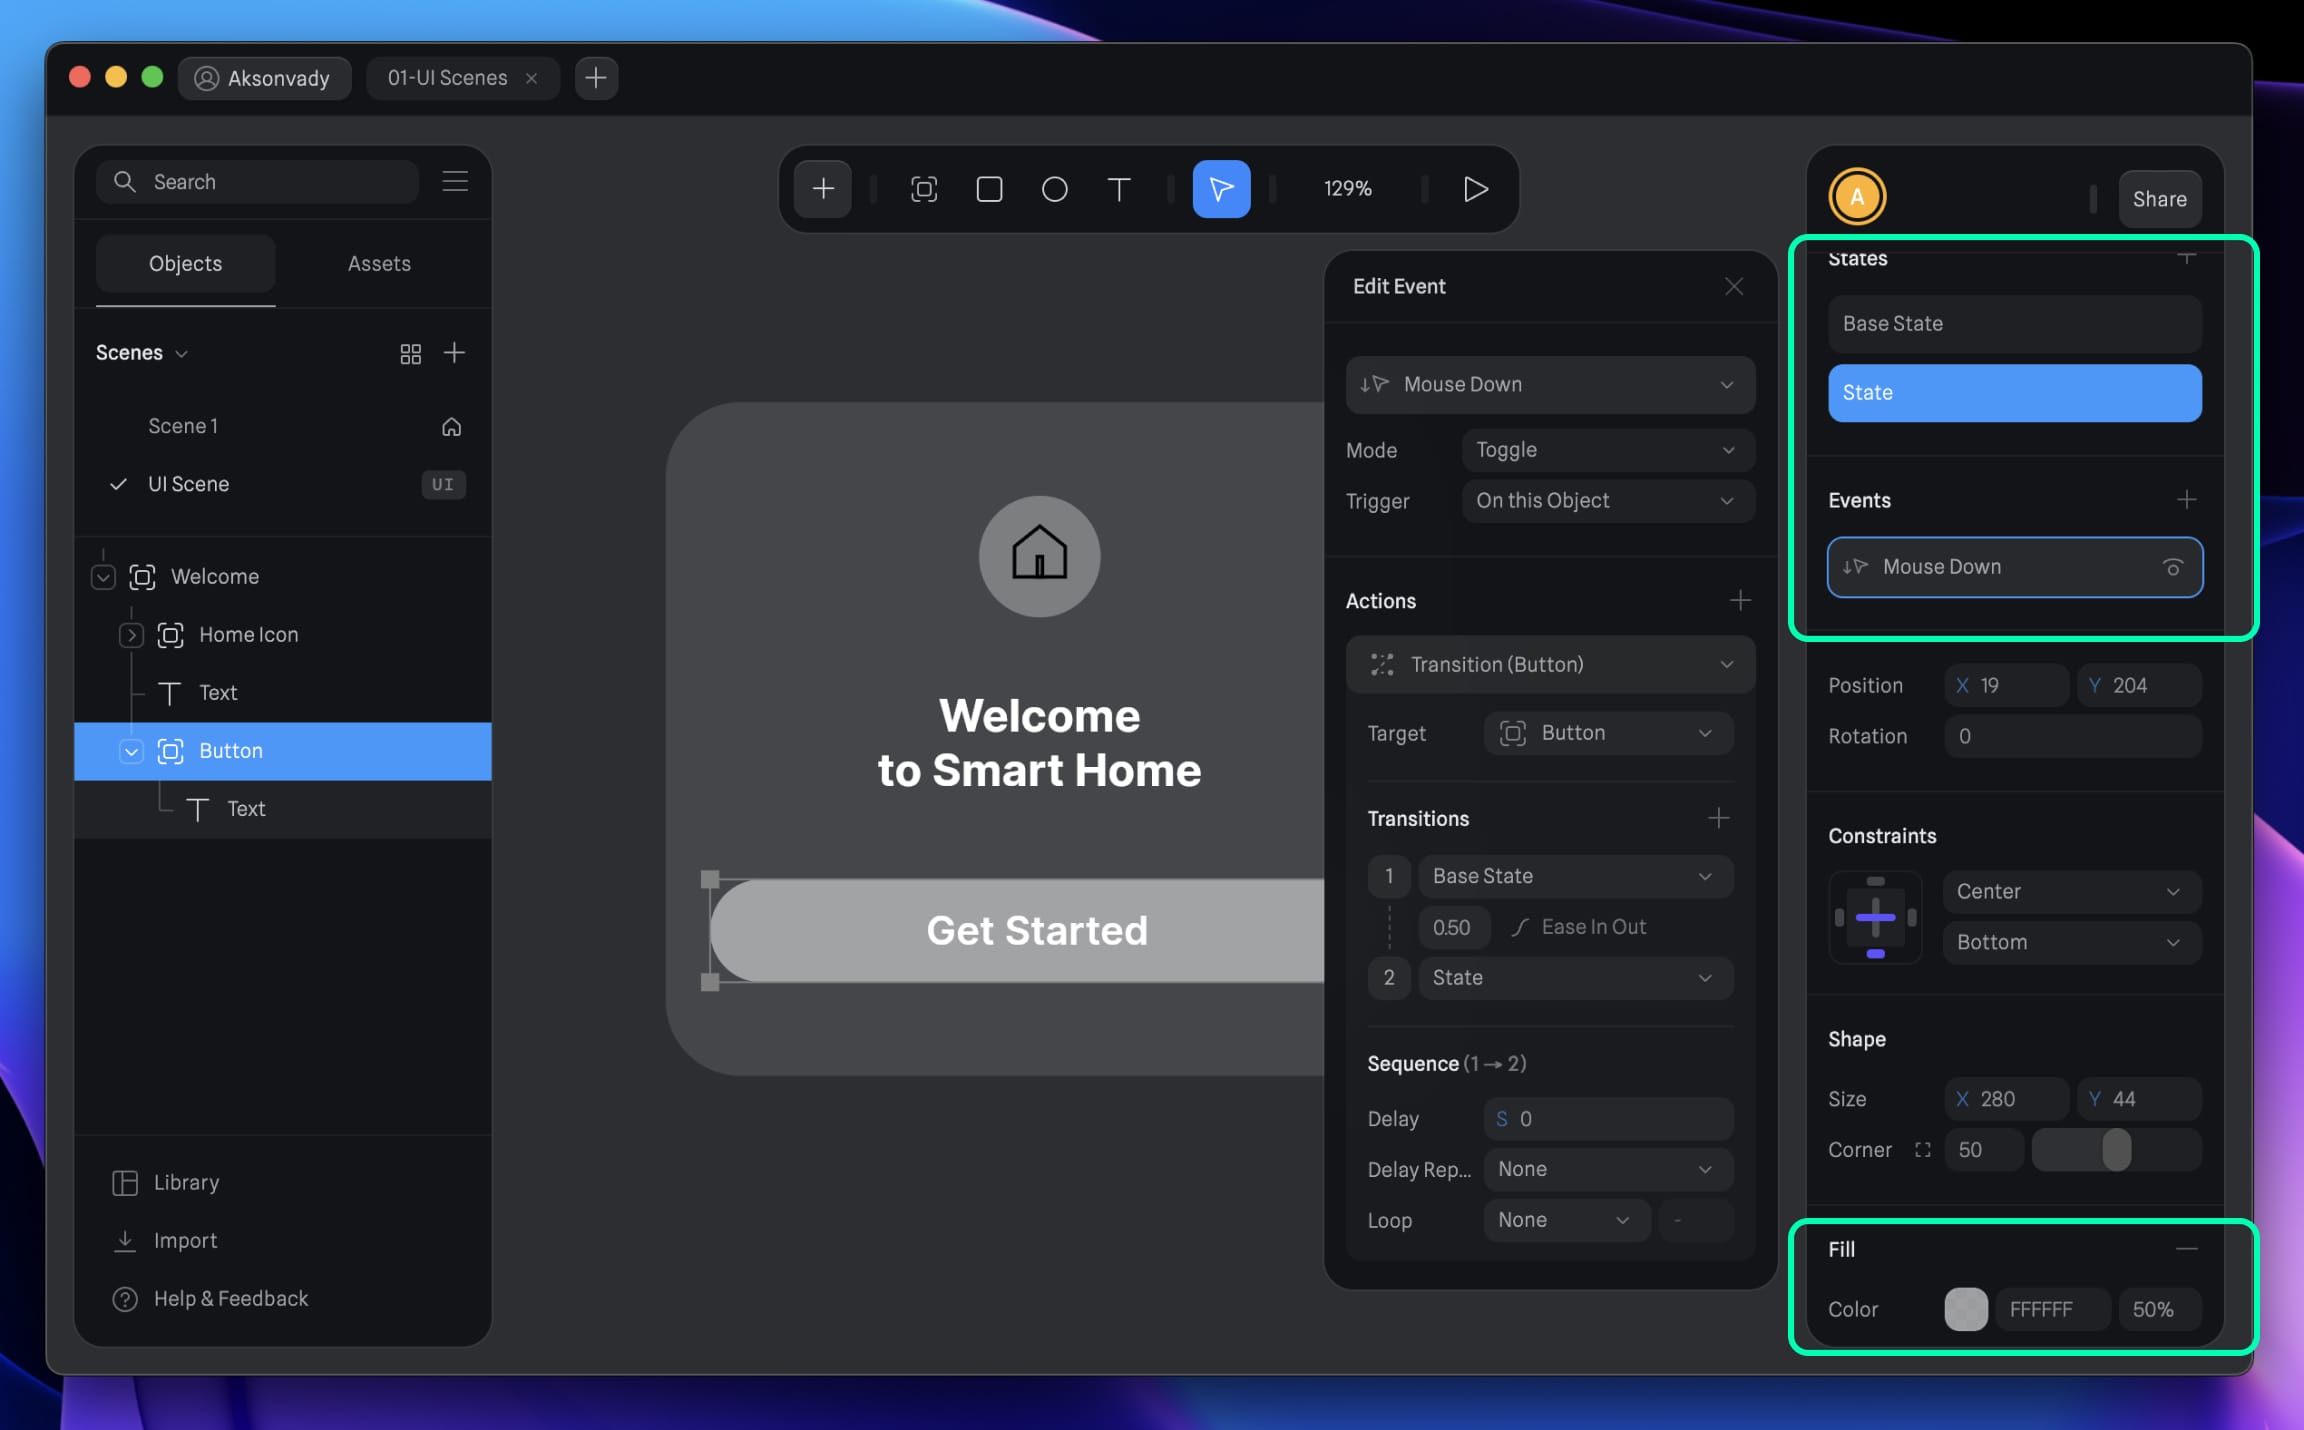
Interactivity for UI Elements
But here's where it gets exciting - UI Scenes allows you to integrate these UI elements with 3D objects using Spline's event system. They can trigger actions on both UI elements and 3D objects, ensuring smooth integration.
Setting Up an Interactive Button
- Select Your Button: Click on the Button layer to begin.
-
Create a New State:
- Find the State panel.
- Click the Plus Icon to introduce a new state.
-
Configure the New State:
- Open the Fill panel.
- Set the opacity to 50% to indicate interaction.
Configuring an Event
-
Navigate to the Events Panel:
- Click the Plus Icon to add a new event.
- Change the trigger from Start to Mouse Down to activate on click.
- Keep the default event settings.
-
Add an Action:
- In the Action section, hit the Plus Icon.
- Choose Transition to define the button's behavior.
Applying the Action
- Target Selection: Choose the Button from the options provided.
-
Transitions Setup:
- Transition 1 should be your Base State.
- Transition 2 should be the new State you created.
-
Animation Details:
- Choose Ease In Out for a smooth transition.
- Set Duration to 0:50 for a swift yet noticeable effect.
- Mode Selection: Pick Toggle to allow the button to switch between states on each click.
Switching Between Frames
Upon creating a 3D UI Frame and selecting it, a new UI panel will emerge in the inspector. From this panel, you can choose which 2D UI Frame will be rendered within that particular 3D UI Frame.

Spatial Mode vs Screen Mode
In Spline, when you're working with 3D UI Frames, you have two primary ways to display them within your 3D scenes:
Spatial Mode:
- Default Setting: 3D UI Frames are naturally integrated into your 3D scene.
- Usage: Ideal for seamlessly blending UI elements within your 3D environment.
Screen Mode:
- Custom Setting: Allows you to designate a specific UI Frame to overlay on top of your scene in a screen-like manner.
- Usage: Particularly handy for designing user interfaces such as menus or Heads-Up Displays (HUDs), ensuring they stand out distinctly.
![Create 3D UI Scene image 9]()

Conclusion
UI Scenes in Spline revolutionize 3D content creation by seamlessly blending 2D and 3D elements in one space. With this feature, you can create interactive UIs that blend seamlessly with your 3D scenes, offering endless design possibilities. Dive into UI Scenes now and unlock your creativity in the world of multi-dimensional design!
Templates and source code
Download source files
Download the videos and assets to refer and learn offline without interuption.
Design template
Source code for all sections
Video files, ePub and subtitles
Assets
Videos
1
Intro to Spline for iOS and visionOS
Comprehensive 3D Design Course: From Basics to Advanced Techniques for iOS and visionOS using SwiftUI
7:25
2
Basic Shapes in 3D Smart Home
Transforming simple shapes into a 3D base for a house model scene
10:12
3
Materials, Lights and Effects
Enhance your 3D scene by incorporating elements from the lore ibrary and adding materials and lighting to add realism
12:11
4
Camera Animation and States
Creating dynamic scenes with the addition of animations
7:05
5
3D Thermostat and Cloner
Learn how to design a thermostat interface with basic shapes
14:38
6
Buttons and Components
Creating knobs and buttons elements and turning them to components
8:26
7
Path Animation and Rotation
Animating a Thermostat Interface: A Step-by-Step Guide
7:10
8
Create a 3D iOS App Icon
Crafting iOS 3D Icons: A Comprehensive Tutorial
7:09
9
Create a visionOS App Icon
Discover how to design the Photos app icon, enhancing the visual experience in visionOS.
9:53
10
Create 3D UI Scene
Learn how to design and implement 2D user interfaces to integrate within 3D scenes, enabling the triggering of actions on any 3D object
9:49
11
Particles Animation
Discover the new particle feature designed to create a range of visual effects like fire, smoke, rain, snow, and other dynamic phenomena
20:30
12
Export to SwiftUI Project
Crafting Stunning 3D Experiences: A Step-by-Step Guide with Spline for iOS Apps
16:20
Meet the instructor
We all try to be consistent with our way of teaching step-by-step, providing source files and prioritizing design in our courses.
Akson Phomhome
UI Designer
Designer at Design+Code.
13 courses - 60 hours
AI Design with Ideogram
Meet Ideogram, an AI-powered image generation tool that takes your ideas and transforms them into stunning visuals. Whether you're a designer, marketer, or just a visual enthusiast, Ideogram simplifies the creative process. In this guide, we’ll walk you through step-by-step instructions to create beautiful logos, social media posts, and more.
1 hrs
Build a SwiftUI app with Claude AI
This comprehensive SwiftUI course combines cutting-edge AI assistance with hands-on development, guiding you through the process of transforming Figma designs into fully functional iOS applications. Leveraging Claude 3.5 Sonnet, you'll learn to efficiently generate and refine SwiftUI code, create reusable components, and implement advanced features like animations and responsive layouts.
9 hrs
Prototype and Code iOS apps in Figma and SwiftUI
Welcome to our course on designing a sleek wallet interface with Figma! You’ll learn to create a visually appealing and functional wallet interface using DesignCode and Apple UI Kits. Master prototyping, swipe gestures, carousel animations, overlays, and reusable components. Plus, explore a Figma plugin to easily transition from design to SwiftUI. By the end, you’ll create dynamic, user-friendly prototypes.
3 hrs
Create 3D UI for iOS and visionOS in Spline
Comprehensive 3D Design Course: From Basics to Advanced Techniques for iOS and visionOS using SwiftUI
3 hrs
3D UI Interactive Web Design with Spline
Learn to create 3D designs and UI interactions such as 3D icons, UI animations, components, variables, screen resize, scrolling interactions, as well as exporting, optimizing, and publishing your 3D assets on websites
3 hrs
Design and Prototype for iOS 17 in Figma
Crafting engaging experiences for iOS 17 and visionOS using the Figma design tool. Learn about Figma's new prototyping features, Dev Mode, variables and auto layout.
6 hrs
Design and Prototype Apps with Midjourney
A comprehensive course on transforming Midjourney concepts into interactive prototypes using essential design techniques and AI tools
8 hrs
Web App Design using Midjourney and Figma
Get UI inspirations from Midjourney and learn UI design, colors, typography as a beginner in Figma
2 hrs
UI Design for iOS 16 in Sketch
A complete guide to designing for iOS 16 with videos, examples and design files
3 hrs
UI Design Android Apps in Figma
Design Android application UIs from scratch using various tricks and techniques in Figma
2 hrs
UI Design Smart Home App in Figma
Design a Smart Home app from scratch using various tricks and techniques in Figma
2 hrs
UI Design Quick Apps in Figma
Design application UIs from scratch using various tricks and techniques in Figma
12 hrs
Figma Handbook
A comprehensive guide to the best tips and tricks in Figma
6 hrs